Unboxing the Cosmo Communicator

Like I did when receiving the Gemini PDA, I want to share the first impressions while unboxing the brand new Cosmo Communicator, I have received today. About one year ago I have backed Planet Computers Cosmo Communicator Indiegogo campaign. Planet Computers has promised a device that is different from anything else, that is available for purchase. The Cosmo Communicator is a clamp-shell class device with a fully integrated keyboard and touchscreen and full phone usability that is designed for Android, but will also be capable of running Linux or Sailfish OS. Major improvements compared to the Gemini PDA, beside better specs, are the outside cover display and the backlit keyboard. No need to go through the full specs here, everything interesting regarding these can be read on Planet Computers web page. Yesterday, after a long time of waiting the parcel with the Cosmo finally arrived.

Cosmo Parcel
Parcel containing the Cosmo Communicator

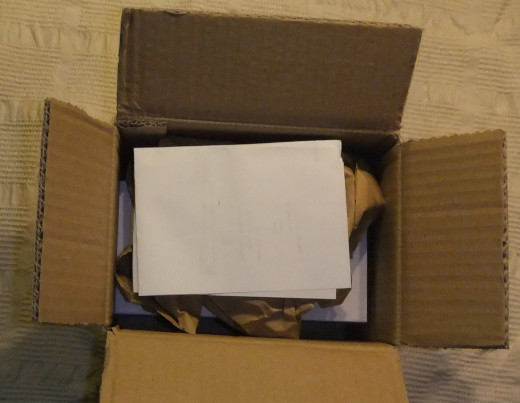
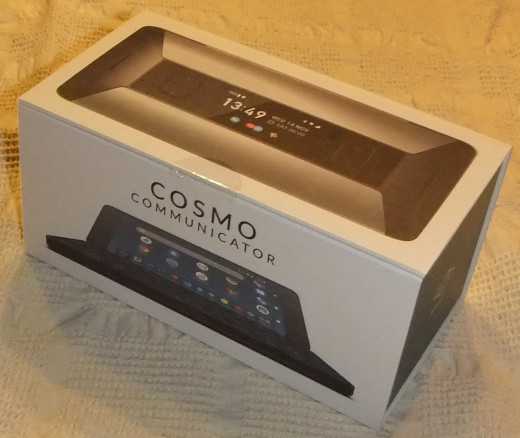
Inside the parcel has been a single box

cosmo box
Box containing the Cosmo Communicator

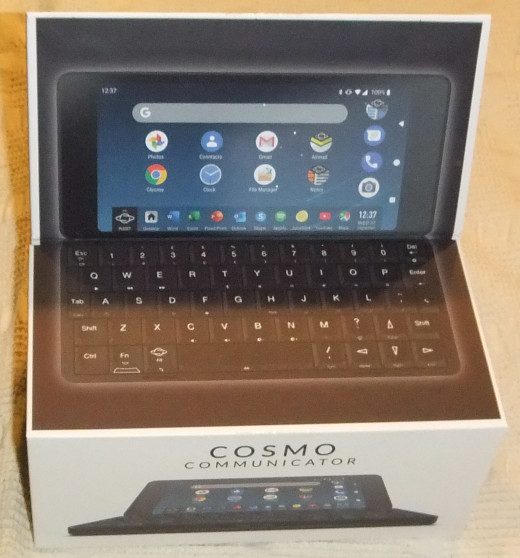
Before opening the box has to be fold out.

cosmo box fold out
Fold out Cosmo box

After Opening the box one can see the well packed Cosmo in there.

csomo box opened
Opened Cosmo box

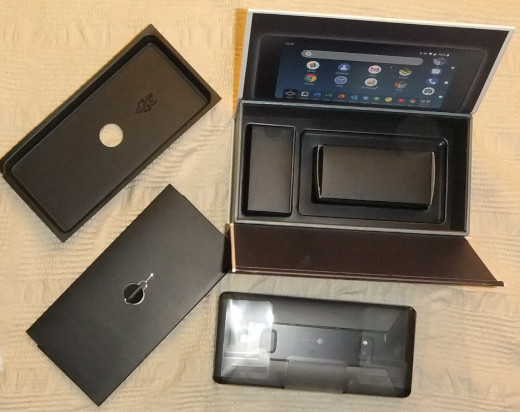
The full content of the box can be seen below. One can see the Cosmo wrapped well in foil as well as an envelope containing a quick start manual and the Sim card tool. Still in the box are two smaller boxes containing the charger and the USB cable.

cosmo content
Cosmo box content

After removing the foil we can see the Cosmos full beauty.

cosmo
The Cosmo Communicator

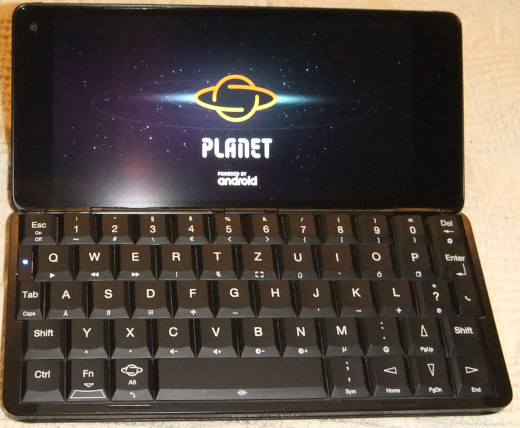
With the opened device we can see the display and the German QWERTZ keyboard. Keyboard and hinge even feel more solid as with the Gemini PDA.

cosmo booting
Opened Cosmo booting Android

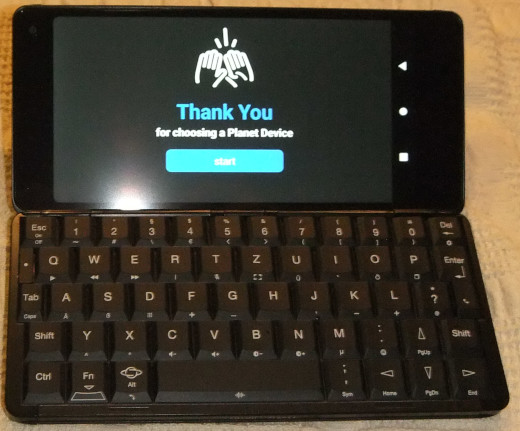
After booting the Cosmo shows the initial welcome screen. With a press to the start button one could start the initial setup process.

cosmo welcome
Cosmo welcome screen

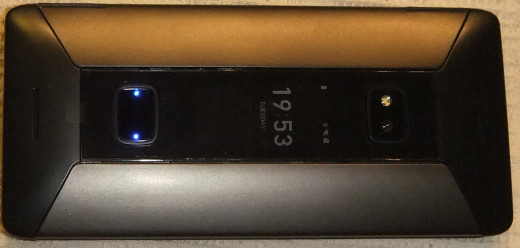
The outer cover touch display, which shows the caller id and allows to accept calls can be seen below.

outer display
Cosmo Communicators outer touchscreen showing date and time

For the Cosmo Communicator I also ordered a third party belt case which can be seen below with the Cosmo inside and a Adonit Dash2 stylus attached.

cosmo belt case
Third party belt case with the Cosmo

I am hoping you have enjoyed the photo series and some first impressions of the Cosmo. Further articles regarding testing some aspects of the device, and hopefully some solutions will follow. Stay tuned for updates.

Jürgen

1 Star2 Stars3 Stars4 Stars5 Stars (4 votes, average: 3.50 out of 5)
Loading...

Modular kernel for the Gemini PDA available from the gemian repository

Recently Adam Boardman and I have managed to integrate the modular kernel for the Gemini PDA into the gemian kernel repository. So, from now on, whenever the kernel gets improved, the modular kernel gets built and the update is available for Debian via apt.

Installing the modular kernel

From now on, the modular kernel for the Gemini PDA can be installed easily using apt:

sudo apt install gemian-modular-kernel

When using the new bootloader the kernel gets flashed to the boot partition automatically. This works because the new bootloader passes the current boot partition’s name to the kernel using the kernel cmdline. The cmdline can be examined with:

cat /proc/cmdline

When using the old bootloader with the Gemini PDA this information is not available to the kernel and consecutively to the operating system, thus one still has to flash the kernel image manually after installing or updating the kernel package. For this one has to carefully decide which boot partition the Linux system is being booted from. Using the wrong partition name can render other installed operating systems unbootable. To recover, flashing the wrongly overwritten boot partition using the flash tool might be necessary. When knowing the boot partition the new kernel can be flashed using dd (the X in bootX has to be replaced with the number of the boot partition) as shown below.

sudo dd if=/usr/share/kernel/linux-boot.img of=/dev/disk/by-partlabel/bootX

After flashing the kernel the either or the other way a reboot is necessary. The boot partition number can be determined from the scatter file that has been used initially to flash the Gemini. Alternatively it can be found out from the key combination that has been used to boot the Gemini. Detailed information on this can be found in the Gemini bootloader documentation.

Building out of tree modules

For building out of tree modules with the Gemini (in example for using USB devices that are not supported with the kernel), in addition to the kernel, the kernel-headers package has to be installed:

sudo apt install gemian-modular-kernel-headers

With the kernel headers and the appropriate build toolchain (gcc, etc.) additional kernel modules can be compiled on the Gemini. Instructions on how to do this can usually be found with the module source.

Some prebuilt modules (iptables mirror target, frandom, 88XXau) for the kernel can be downloaded below:

gemini-modules-extra-3.18.41.tar.gz (6296 downloads )

To use the modules, the downloaded archive has be extracted to the root directory. Afterwards depmod has to be executed:

cd /; sudo tar -xzf /path/to/gemini-modules-extra-3.18.41.tar.gz; sudo depmod

With high probability these modules should still be usable after upgrading the modular kernel to a newer build.

regards
Jürgen

1 Star2 Stars3 Stars4 Stars5 Stars (2 votes, average: 5.00 out of 5)
Loading...

Modular Linux kernel for the Gemini PDA with cut+paste fix

Using Debian with the Gemini PDA one can use cut and paste, for example in QTerminal, using the key combinations [Ctrl]+[Shift]+[c] and [Ctrl]+[Shift]+[v]. Unfortunately this did not work using the left Shift key. There is no need to fiddle with the keyboard configuration to fix this, since it is a kernel issue.

Again Adam Boardman has fixed one of the most annoying issues within the Gemini’s Linux kernel. His fix priorizes the mentioned useful keyboard combinations over the ghosted¹ versions. Again this fix is worth another kernel build. As usual, I want to share my kernel build below:

The kernel configuration is unchanged (with respect to the previous article), but included for completeness: gemini-3.18.41+-config.gz (4042 downloads )

For the build, again the updated kernel source the from https://github.com/gemian/gemini-linux-kernel-3.18 has been used.

Again the kernel modules for the iptables MIRROR target (will not be usable with the default iptables version on the Gemini) and frandom are included. This time also the module for the awus1900 and similar usb wifi dongles (88XXau.ko) has been added.

Those who do not want to go through the build themselves can download my prebuild kernel from here:

Kernel Image: linux_boot-gemini-3.18.41+.img (568 downloads )
Modules: modules_firmware-gemini-3.18.41+.tar.gz (2009 downloads )
(the kernel modules in the previous article should still work, however, the new build is included for completeness)

Instructions for flashing the image can be found on: support.planetcom.co.uk. Make sure to use a proper scatter file, in example the one that has been used for the initial flashing. Using the Download only mode of the flash tool is sufficient. Uncheck all partitions but boot (or boot1 or boot2, depending on your boot order). For the boot partition respectively the boot1 or boot2 partition select the downloaded kernel image.

Alternatively you can flash the kernel using dd:

dd if=linux_boot-gemini-3.18.41+.img of=/dev/block/disk/by-partlabel/boot

If Linux is not your primary operating system on the Gemini use boot1 or boot2 instead, depending on your partition layout.

After flashing, copy the modules archive onto your Gemini and extract it in your root directory:

cd /
tar -xzf /path_to/modules_firmware-gemini-3.18.41+.tar.gz

After rebooting the device, cut and paste using the keyboard combinations should work in QTerminal. Currently I am working on getting the modular kernel configuration into the main Gemini kernel. Hopefully we manage to get this done soon. If so, this might have been the last Gemini modular kernel post.

Jürgen

References:
1. oesf.org: keyboard ghosting

1 Star2 Stars3 Stars4 Stars5 Stars (2 votes, average: 5.00 out of 5)
Loading...

Recovery from a failed kernel upgrade on Lamobo R1

Yesterday I have updated my Lamobo R1 router board running Debian Stretch the usual way with apt update;apt upgrade. This time many updates were involved including a kernel update from 4.9.130-2 to 4.9.144-3. After rebooting the device it did not come up again. The same happens with the 4.9.144-3 kernel and the Bananapi board which is nearly identical to the Lamobo R1.

After attaching a screen to the HDMI output I was able to see the boot messages. The last thing I noticed was that uboot was struck at “Starting kernel”. Unfortunately there has been no more useful information. Maybe one could get some more information using the serial console. Obviously the new kernel is broken for the Lamobo and the Bananapi. The corresponding bug report can be monitored on bugs.debian.org. The natural reaction is to downgrade the kernel to the previous state, which is not as simple as on Intel based devices. Since it is quite probable that others experience the same problem with the kernel upgrade I will show in the following how to recover from the upgrade.

First of all I inserted the sd card containing the operating system into a notebook and mounted the boot partition. Luckily there still has been a older backup kernel remaining from system setup. In my case this has been a 4.9.0-7 kernel. So I extracted the boot script from the boot.scr file.

dd if=boot.scr of=boot.script bs=72 skip=1

In the resulting boot.script I replaced the line

setenv fk_kvers ‘4.9.0-8-armmp-lpae’

with

setenv fk_kvers ‘4.9.0-7-armmp-lpae’

This might be different if the backup kernel available has a different version. If there is no working backup kernel, one might try to get a kernel image from a different source, in example extracting from one of the older Debian packages, from the boot partition of a second device or if one has been paranoid, from a backup.

Afterwards the boot.scr file has to be regenerated. For this the u-boot-tools package has to be present on the system used for the recovery.

mkimage -C none -A arm -T script -d boot.script boot.scr

After reinserting the card into the Lamobo R1 eventually I have been able to boot the system with the old kernel version. Afterwards it has been possible to restore the previous kernel version (4.9.130-2) with:

dpkg -i linux-image-4.9.0-8-armmp-lpae_4.9.130-2_armhf.deb

It might be a good idea to prevent further kernel upgrades until the mentioned bug has been solved. This can easily be done by:

apt-mark hold linux-image-4.9.0-8-armmp-lpae

Hopefully this helps others facing the same problem after this or any other kernel update on these or similar devices.

Jürgen

1 Star2 Stars3 Stars4 Stars5 Stars (2 votes, average: 5.00 out of 5)
Loading...

Building a kernel module for the awus1900 Wifi stick and the Gemini PDA

A few days ago I have been asked if it is possible to build a driver for the awus1900 Wifi stick for the Gemini PDA. To be honest, I did not know, so I gave it a try.

The awus1900 uses Realtek’s rtl8814au chipset. The Linux driver for this chipset is available at many locations around the net. Most ones, I have tried, have not been compilable against the Gemini’s kernel. The driver at https://github.com/aircrack-ng/rtl8812au has been compilable with some minor modifications against the kernel source used for the kernel in Modular Linux kernel for the Gemini PDA with lid close fix.

First of all some parameters in the Makefile had to be changed to match the Gemini:

  • CONFIG_PLATFORM_I386_PC = n (disable x86 build)
  • CONFIG_PLATFORM_ARM64_RPI = y (enable arm64 build)

Some more parameters have been enabled for features in the hope that these do not cause problems:

  • CONFIG_POWER_SAVING = y
  • CONFIG_USB_AUTOSUSPEND = y
  • CONFIG_80211W = y

With all these changes the build fails complaining about STATION_INFO_SIGNAL and many more being undeclared. The module’s source expects these defines to be present in the kernel source for kernels below version 4.0. Most probably the Gemini kernel tree is different than other 3.x trees. So the line 23

#if (CFG80211_API_LEVEL >= KERNEL_VERSION(4, 0, 0))

in os_dep/linux/ioctl_cfg80211.c has been replaced with

#ifndef STATION_INFO_SIGNAL

to get the module source build against the Gemini’s kernel. Afterwards it has been possible to cross compile the kernel module by running make:

make ARCH=arm64 KSRC=/path_to_lib_modules_dir/3.18.41+/build

After building the module it can be copied to /lib/modules/3.18.41+/extra/ (or any other proper directory) on the Gemini and used afterwards. For those who do not want to build the module themselves, the binary modules for the kernel shared in the article Modular Linux kernel for the Gemini PDA with lid close fix can be downloaded from here: rtl88XX.zip (3724 downloads )

Regards
Jürgen

1 Star2 Stars3 Stars4 Stars5 Stars (1 votes, average: 5.00 out of 5)
Loading...

Libreoffice update failure

Today, when updating the Debian OS on my Gemini PDA, the upgrade for libreoffice failed complaining about the file dialog.xlc being present in multiple packages. A similar issue already has occurred with the Gemini PDA half a year ago¹. It is quite probable, that the same problem occurs with other Debian based distributions, as well. But let us have a look into the details first.

The usual update process (apt-get update;apt-get upgrade) resulted in apt complaining about the file dialog.tlc being present in both packages, libreoffice-base and libreoffice-common and failed:

Unpacking libreoffice-base (1:5.2.7-1+deb9u5) over (1:5.2.7-1+deb9u4) ...
dpkg: error processing archive /tmp/apt-dpkg-install-Y89hUD/03-libreoffice-base_1%3a5.2.7-1+deb9u5_arm64.deb (--unpack):
 trying to overwrite '/usr/lib/libreoffice/share/basic/dialog.xlc', which is also in package libreoffice-common 1:5.2.7-1+deb9u4
...
Errors were encountered while processing:
 /tmp/apt-dpkg-install-Y89hUD/03-libreoffice-base_1%3a5.2.7-1+deb9u5_arm64.deb
E: Sub-process /usr/bin/dpkg returned an error code (1)

Every subsequent attempt to upgrade the system fails. The system now is in broken state, that prevents upgrades. In example a second try to run apt upgrade only resulted in the hint to try apt –fix-broken install:

root@gemini:/home/gemini# apt upgrade
Reading package lists... Done
Building dependency tree       
Reading state information... Done
You might want to run 'apt --fix-broken install' to correct these.
The following packages have unmet dependencies:
 libreoffice-base : Depends: libreoffice-base-core (= 1:5.2.7-1+deb9u4) but 1:5.2.7-1+deb9u5 is installed
                    Depends: libreoffice-base-drivers (= 1:5.2.7-1+deb9u4) but 1:5.2.7-1+deb9u5 is installed
                    Depends: libreoffice-core (= 1:5.2.7-1+deb9u4) but 1:5.2.7-1+deb9u5 is installed
 libreoffice-core : Breaks: libreoffice-base (< 1:5.2.7-1+deb9u5) but 1:5.2.7-1+deb9u4 is installed
                    Recommends: libpaper-utils but it is not installed
E: Unmet dependencies. Try 'apt --fix-broken install' with no packages (or specify a solution).

Unfortunately, running apt –fix-broken install did not solve the problem:

root@gemini:/home/gemini# apt --fix-broken install  
Reading package lists... Done
Building dependency tree       
Reading state information... Done
Correcting dependencies... Done
...
The following packages will be upgraded:
  libreoffice-base
1 upgraded, 0 newly installed, 0 to remove and 1 not upgraded.
22 not fully installed or removed.
Need to get 0 B/1.344 kB of archives.
After this operation, 0 B of additional disk space will be used.
Do you want to continue? [Y/n] 
(Reading database ... 125897 files and directories currently installed.)
Preparing to unpack .../libreoffice-base_1%3a5.2.7-1+deb9u5_arm64.deb ...
Unpacking libreoffice-base (1:5.2.7-1+deb9u5) over (1:5.2.7-1+deb9u4) ...
dpkg: error processing archive /var/cache/apt/archives/libreoffice-base_1%3a5.2.7-1+deb9u5_arm64.deb (--unpack):
 trying to overwrite '/usr/lib/libreoffice/share/basic/dialog.xlc', which is also in package libreoffice-common 1:5.2.7-1+deb9u5
E: Sub-process /usr/bin/dpkg returned an error code (1)<br>

Since the error indicates clearly, that dpkg fails to overwrite the file dialog.xlc, I tried the solution I have used to fix the issue with the libreoffice update half a year ago. So I “instructed” apt-get to overwrite the conflicting files:

apt-get -o Dpkg::Options::=”–force-overwrite” -f install

This finally solved the issue and allowed the libreoffice upgrade to complete:

root@gemini:/home/gemini# apt-get -o Dpkg::Options::="--force-overwrite" -f install
Reading package lists... Done
Building dependency tree       
Reading state information... Done
Correcting dependencies... Done
...
The following packages will be upgraded:
  libreoffice-base
1 upgraded, 0 newly installed, 0 to remove and 1 not upgraded.
21 not fully installed or removed.
Need to get 0 B/1.344 kB of archives.
After this operation, 0 B of additional disk space will be used.
Do you want to continue? [Y/n] 
(Reading database ... 125897 files and directories currently installed.)
Preparing to unpack .../libreoffice-base_1%3a5.2.7-1+deb9u5_arm64.deb ...
Unpacking libreoffice-base (1:5.2.7-1+deb9u5) over (1:5.2.7-1+deb9u4) ...
dpkg: warning: overriding problem because --force enabled:
dpkg: warning: trying to overwrite '/usr/lib/libreoffice/share/basic/dialog.xlc', which is also in package libreoffice-common 1:5.2.7-1+deb9u5
dpkg: warning: overriding problem because --force enabled:
dpkg: warning: trying to overwrite '/usr/lib/libreoffice/share/basic/script.xlc', which is also in package libreoffice-common 1:5.2.7-1+deb9u5
Processing triggers for mime-support (3.60) ...
Processing triggers for desktop-file-utils (0.23-1) ...
Processing triggers for libc-bin (2.24-11+deb9u3) ...
Processing triggers for man-db (2.7.6.1-2) ...
Processing triggers for shared-mime-info (1.8-1+deb9u1) ...
Unknown media type in type 'all/all'
Unknown media type in type 'all/allfiles'
Setting up fonts-opensymbol (2:102.7+LibO5.2.7-1+deb9u5) ...
Setting up uno-libs3 (5.2.7-1+deb9u5) ...
Processing triggers for hicolor-icon-theme (0.15-1) ...
Setting up ure (5.2.7-1+deb9u5) ...
Processing triggers for fontconfig (2.11.0-6.7+b1) ...
Setting up libreoffice-style-galaxy (1:5.2.7-1+deb9u5) ...
Setting up libreoffice-common (1:5.2.7-1+deb9u5) ...
Setting up libreoffice-core (1:5.2.7-1+deb9u5) ...
Setting up libreoffice-gtk2 (1:5.2.7-1+deb9u5) ...
Setting up python3-uno (1:5.2.7-1+deb9u5) ...
Setting up libreoffice-base-drivers (1:5.2.7-1+deb9u5) ...
Setting up libreoffice-draw (1:5.2.7-1+deb9u5) ...
Setting up libreoffice-avmedia-backend-gstreamer (1:5.2.7-1+deb9u5) ...
Setting up libreoffice-java-common (1:5.2.7-1+deb9u5) ...
Setting up libreoffice-script-provider-python (1:5.2.7-1+deb9u5) ...
Setting up libreoffice-impress (1:5.2.7-1+deb9u5) ...
Setting up libreoffice-math (1:5.2.7-1+deb9u5) ...
Setting up libreoffice-base-core (1:5.2.7-1+deb9u5) ...
Setting up libreoffice-calc (1:5.2.7-1+deb9u5) ...
Setting up libreoffice-writer (1:5.2.7-1+deb9u5) ...
Setting up libreoffice-base (1:5.2.7-1+deb9u5) ...
Setting up libreoffice-librelogo (1:5.2.7-1+deb9u5) ...
Setting up libreoffice-report-builder-bin (1:5.2.7-1+deb9u5) ...
Setting up libreoffice (1:5.2.7-1+deb9u5) ...
Processing triggers for libc-bin (2.24-11+deb9u3) ...

The referenced thread¹ on oesf.org, regarding the past libreoffice upgrade issue, indicates there are quite some more possibilities that might fix the problem, but this one seems to be the easiest. So if this solution does not work for you, you might want to try one of the other solutions being shown there.

The libreoffice upgrade issue seems to be a reoccurring problem, thus a long term solution should be to fix the debian packages for libreoffice to not inlcude the same file in multiple packages. For the time being, the solution presented here solves the problem and gets the system back into a operational and upgradeable state.

Jürgen

References:
1. oesf.org: apt-get upgrade broke libreoffice

1 Star2 Stars3 Stars4 Stars5 Stars (2 votes, average: 5.00 out of 5)
Loading...

Modular Linux kernel for the Gemini PDA with lid close fix

Sometimes, well, quite often, maybe one out of twenty times when closing the lid, the Gemini PDA running Debian did not turn off the screen and go to sleep, because of keys being pressed by the closing screen before the keyboard gets turned off. When one recognized the Gemini getting hot in the pocket already a quarter to a half of the battery juice was lost.

Recently Adam Boardman has fixed this annoying issue within the Gemini’s Linux kernel. His fix disables the keyboard directly upon lid close, rather than waiting for screen blanking via userspace control. Within a few days after the fix I have not noticed the issue anymore. This fix is more than worth another kernel build. Again, I want to share my kernel build below:

The kernel configuration is unchanged (with respect to the previous article), but included for completeness: gemini-3.18.41+-config.gz (3723 downloads )

For the build, again the updated kernel source the from https://github.com/gemian/gemini-linux-kernel-3.18 has been used.

Again the kernel modules for the iptables MIRROR target (will not be usable with the default iptables version on the Gemini) and frandom are included.

Those who do not want to go through the build themselves can download my prebuild kernel from here:

Kernel Image: linux_boot-gemini-3.18.41+.img (381 downloads )
Modules: modules_firmware-gemini-3.18.41+.tar.gz (1766 downloads )
(the kernel modules in the previous article should still work, however, the new build is included for completeness)

Instructions for flashing the image can be found on: support.planetcom.co.uk. Make sure to use a proper scatter file, in example the one that has been used for the initial flashing. Using the Download only mode of the flash tool is sufficient. Uncheck all partitions but boot (or boot1 or boot2, depending on your boot order). For the boot partition respectively the boot1 or boot2 partition select the downloaded kernel image.

Alternatively you can flash the kernel using dd:

dd if=linux_boot-gemini-3.18.41+.img of=/dev/block/disk/by-partlabel/boot

If Linux is not your primary operating system on the Gemini use boot1 or boot2 instead, depending on your partition layout.

After flashing, copy the modules archive onto your Gemini and extract it in your root directory:

cd /
tar -xzf /path_to/modules_firmware-gemini-3.18.41+.tar.gz

After rebooting the device, it should go to sleep reliably after closing the lid.


Jürgen

1 Star2 Stars3 Stars4 Stars5 Stars (1 votes, average: 5.00 out of 5)
Loading...

siteinfo

Translator